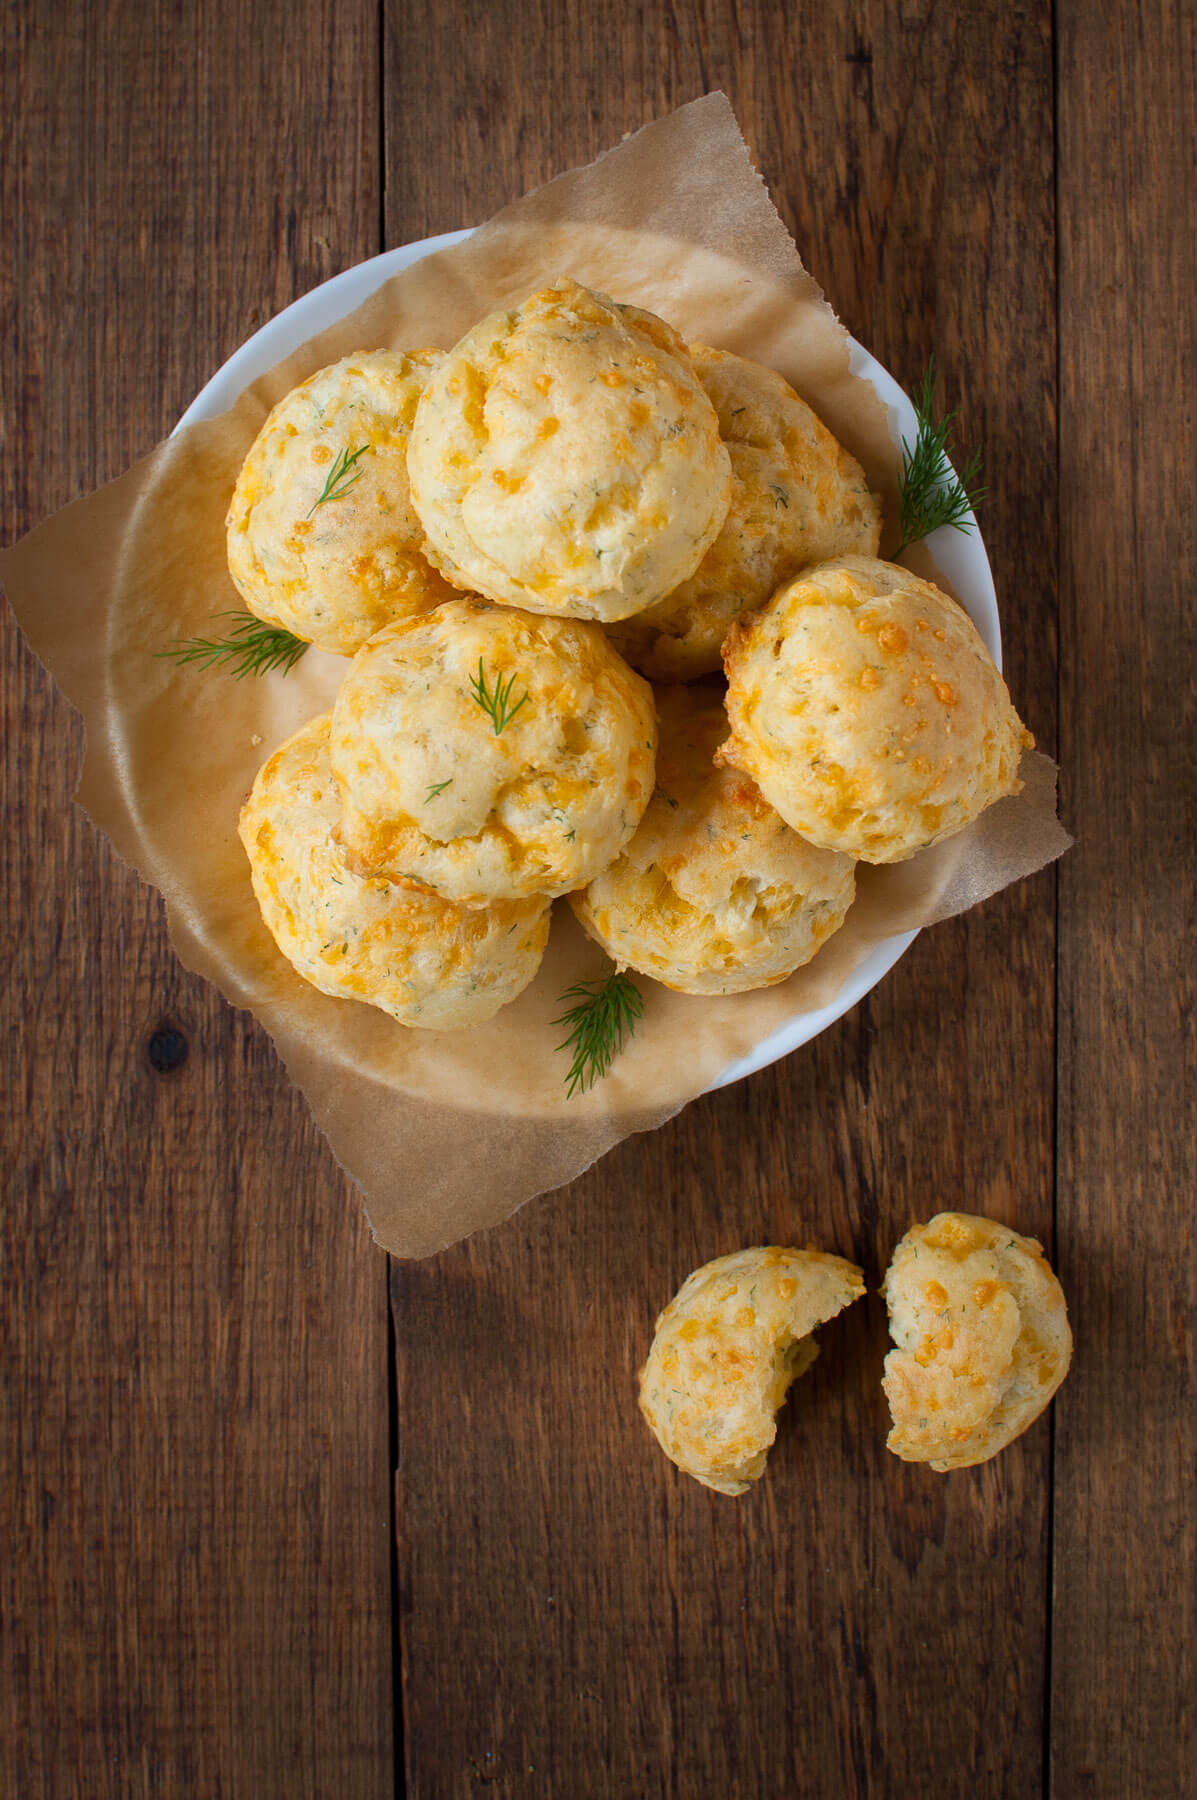
These French cheese puffs (aka cheese gougères) are light and airy, flavored with lots of cheese, and are great as a party appetizer.
- Prep Time:
20 mins - Cook Time:
30 mins - Total Time:
50 mins

When my older daughter looked at my posting schedule and saw that I was making cheddar dill puffs this week, she just about giggled with delight and did a happy dance. Despite being a typical teenage girl, my daughter does NOT do giggles or happy dances (so uncool in her book). But these little babies will bring out the giddiness in anyone.
These cheese puffs are slightly crispy on the outside and all light and airy on the inside. The cheddar cheese and dill add just enough flavor without feeling heavy.
Technically, these cheddar dill puffs are called gougère which in French cooking is a baked savory choux pastry made of choux dough (the same kind used for cream puffs) mixed with cheese. But gougère sounds so intimidating that you might not want to try making these. And that would be a shame since they really are easy to make. So let’s stick with calling them puffs.
Tips for making cheese gougère
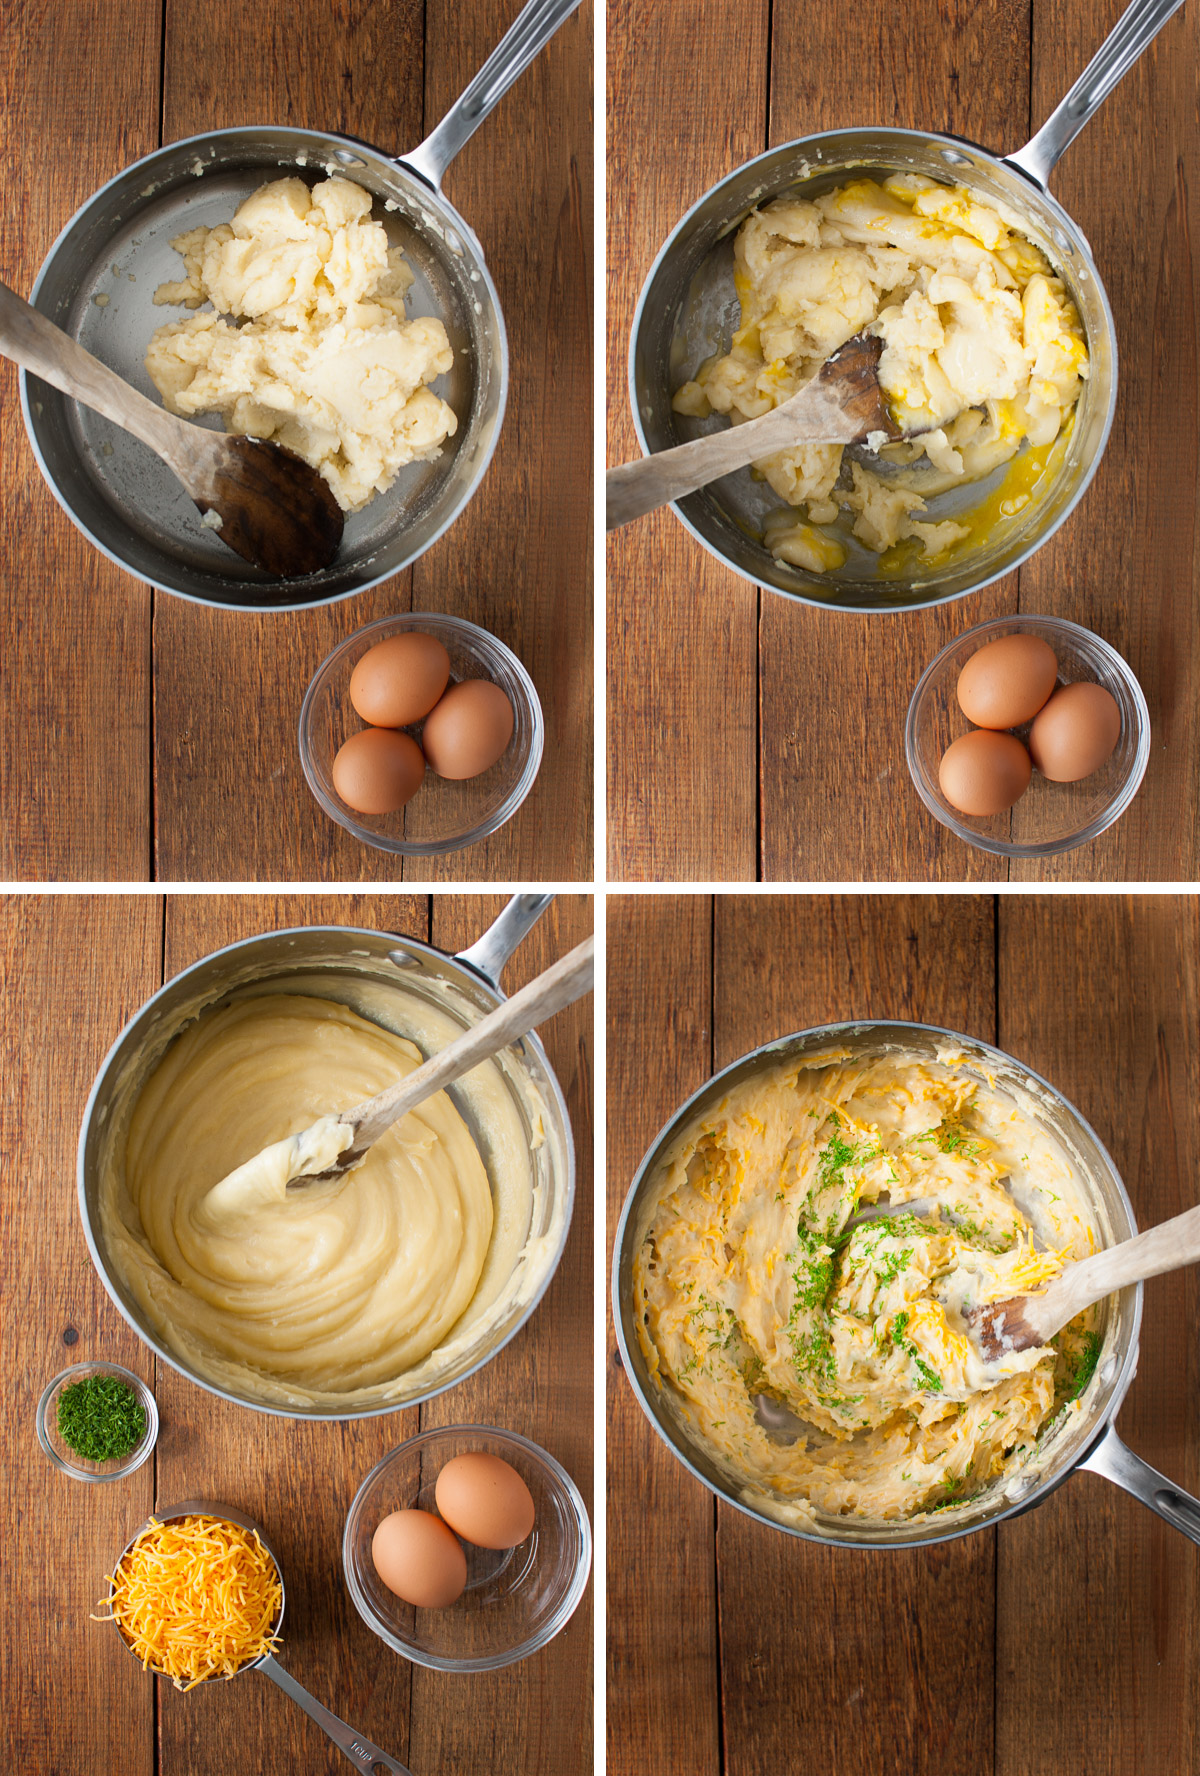
The dough is first cooked on the stovetop, removed from the heat, and then cooled slightly. It’s important to cool the dough a little bit so that the eggs will incorporate smoothly into the dough and not become scrambled eggs. At this point, the dough will look like a big lump of dry clay. That’s OK.
Then the eggs get beaten in one at a time. When you first add in each egg, the dough will separate and look completely messed up like what you see in the upper right photo above. Don’t worry – just keep stirring. As the egg gets incorporated, the dough will get smoother and will magically become more glossy like in the lower left photo above.
Just remember to add the eggs one at a time, incorporating each egg in before adding the next. And stir vigorously.
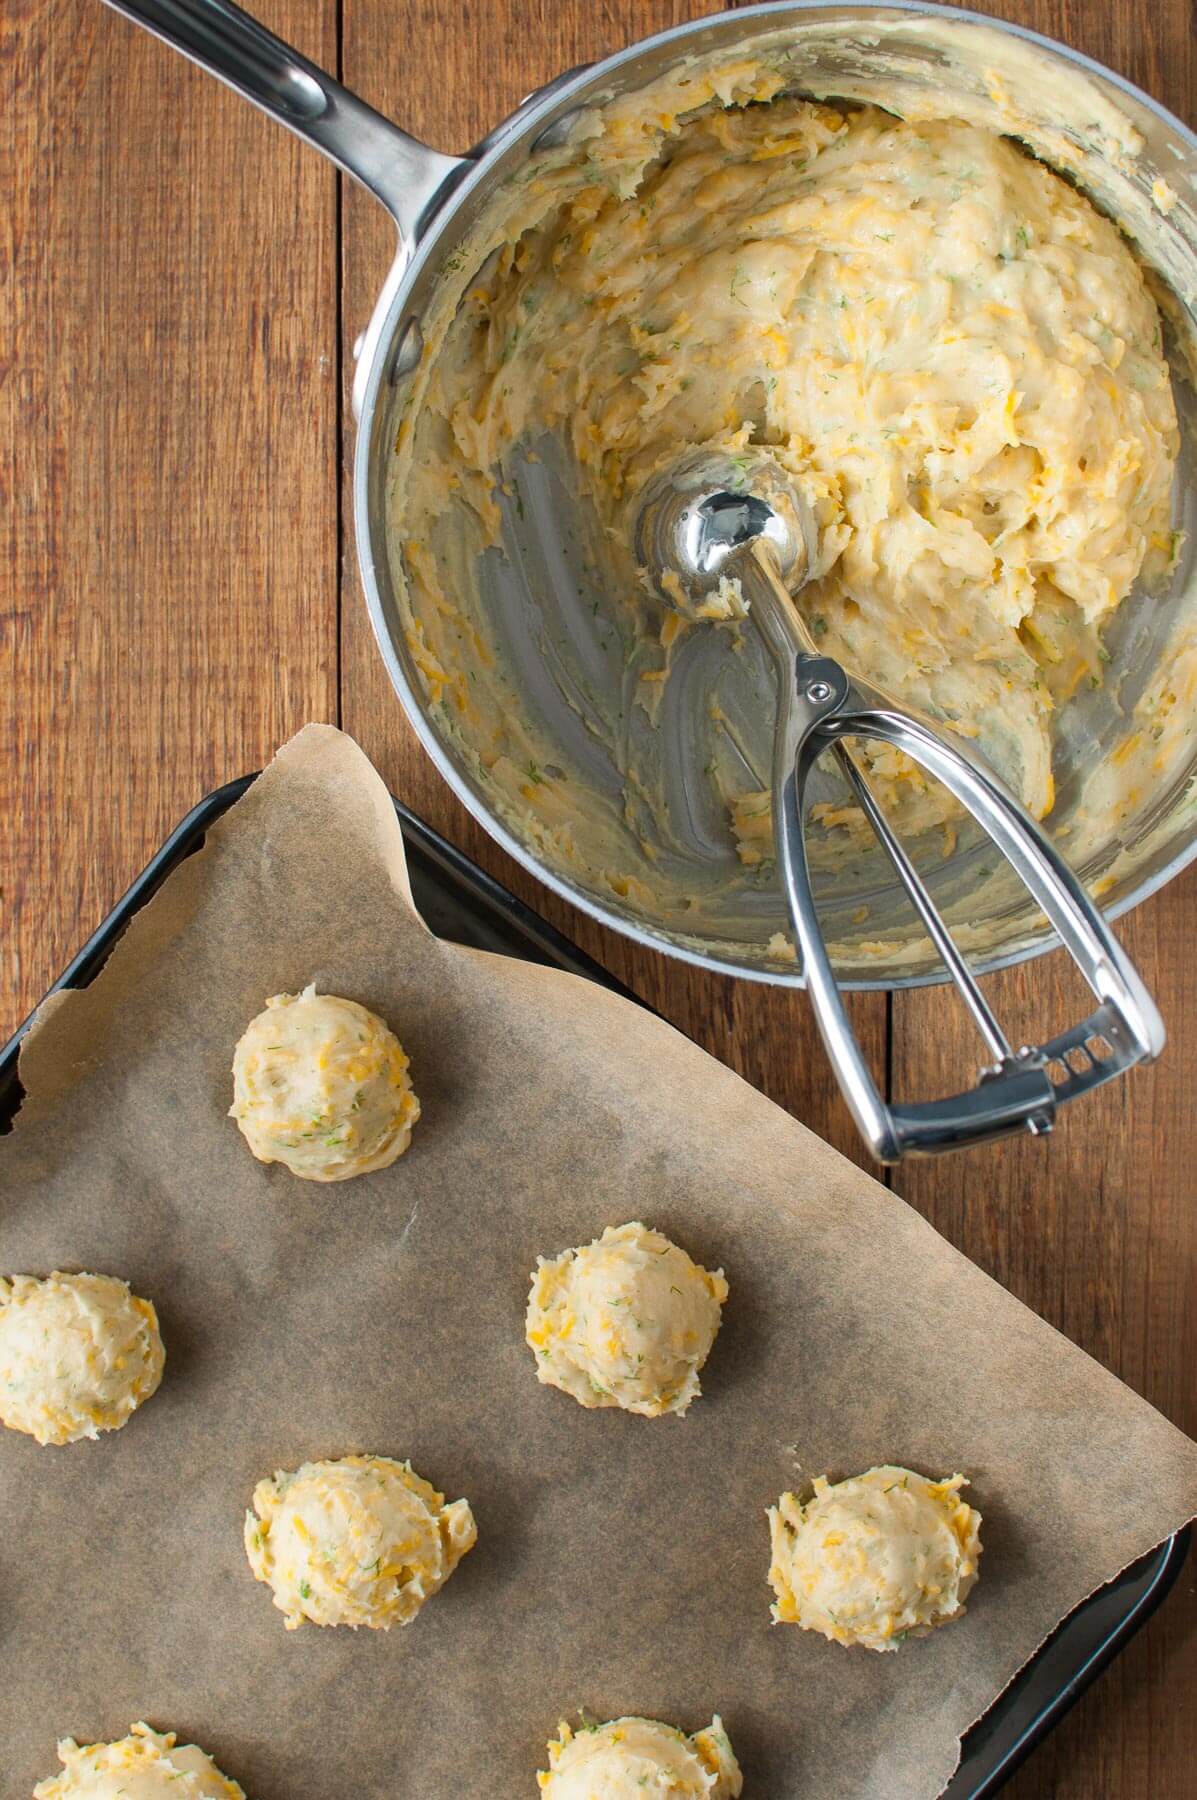
Although most recipes say to pipe the puffs using a pastry bag, I find it much easier to use a small scoop. I use the kind typically used for scooping out cookie dough – a couple of squeezes of the handle will release the dough ball onto the baking sheet quickly and easily.
I use a 1 1/2-inch scoop for these puffs.
Be sure to bake the puffs until they feel slightly crispy when tapped. If you take them out too soon, the puffs will collapse.
Can I double the recipe?
Yes! I often double the recipe for parties. When making a double recipe, I find it easier to use my stand mixer to beat in the eggs (unless you’re looking for a really good arm workout). Be sure to still beat in the eggs one at a time.
Can I make these ahead of time?
Yes! These cheddar dill puffs can be made ahead of time, cooled completely, and then sealed in airtight bags or containers. You can refrigerate them for 2 days or freeze them for 1 week.
To reheat, heat the oven to 350 degrees F and place the puffs in a single layer on baking sheets. Leave enough room between the puffs to allow heat to circulate between them. Place the puffs in the oven until they are heated through, 7-10 minutes if chilled or 15 minutes if they had been frozen.

Ready to party
These puffs are fantastic as a small appetizer before the main event at Thanksgiving or any holiday party. Serve them with a nice chilled white wine and I guarantee all your guests will be giddy too.
If you’re looking for other party-worthy appetizers, I would recommend shrimp campechana, a zesty Mexican shrimp cocktail that is sophisticated and approachable at the same time. I also love pancetta crisps with goat cheese and figs which can be served as a passed appetizer or as a first course in a multi-course dinner party.

Cheddar Dill Puffs
- Prep Time: 20 minutes
- Cook Time: 30 minutes
- Total Time: 50 minutes
- Yield: About 22 puffs (using a 1 1/2-inch scoop)
- Category: Appetizer
- Method: Baking
- Cuisine: American
Description
These French cheese puffs (aka cheese gougères) are light and airy, flavored with lots of cheese, and are great as a party appetizer.
Ingredients
- 1 cup water
- 1/2 cup unsalted butter, cut into tablespoon pieces
- 1/2 teaspoon kosher salt
- 1 cup all-purpose flour
- 4 to 5 large eggs
- 1 1/2 cups finely grated yellow Cheddar (preferably extra-sharp)
- 2 tablespoons finely chopped fresh dill
Instructions
- Preheat oven to 375 degrees F.
- In a large heavy saucepan over medium heat, cook the water, butter, and salt. Bring to a simmer and cook until the butter melts, stirring to combine. Then add flour all at once and cook, stirring vigorously with a wooden spoon. The mixture should start to come together and pull away from the side of the pan after about 2 minutes. Remove from heat and cool slightly, about 3 minutes.
- One at a time, add 4 eggs, beating well after each addition. The batter will separate at first but will become smooth as each egg is mixed in. The mixture should be glossy and just stiff enough to hold soft peaks. If batter is too stiff, beat remaining egg in a small bowl and add to batter 1 teaspoon at a time, beating and then testing batter until it reaches proper consistency. Stir in cheese and dill.
- Line 2 large baking sheets with parchment paper. Using a 1 to 1 1/2 inch diameter scoop, drop the batter by scoopfuls onto the prepared baking sheets, spacing the mounds about 1 inch apart. Bake until the cheddar puffs are golden brown, crisp when tapped, and are puffed up, 25 to 30 minutes. Be sure to switch the baking sheets between the oven racks and rotate them 180 degrees halfway through baking to promote even baking. Serve warm.
Notes
- I used a 1 1/2-inch scoop which made 22 puffs.
- Puffs can be made ahead of time, cooled completely, and then sealed in plastic bags. Puffs can be refrigerated for 2 days or frozen for 1 week. To reheat, place puffs on baking sheets in a preheated 350°F oven for 7-10 minutes if chilled or 15 minutes if frozen or until heated through.
- Recipe from Gourmet Magazine, August 2003.
Originally published .


a says
made as directed except did half recipe and cooked in convection oven so 25 degrees lower temp. excellent. will make again, thanks
Nguyet Vo says
Thank you! Glad you loved the recipe.
Liz says
I made these for thanksgiving and they were very tasty, although they did not puff up as much as in the pictures despite being fully cooked. I think I might have taken the flour and butter off the heat too early. I also made a gluten free version of these last year using Bob’s Red Mill all purpose gluten free flour and those turned out great. The texture was slightly drier but they puffed up nicely.
Nguyet says
I’m sorry they didn’t puff for you. You might be right about needing to cook the flour and butter longer but it sounds like they still tasted good.
Jennifer says
The recipe does not state when to add the cheese and dill. Did I miss something?
Nguyet says
Last sentence of Step 3. Let me know if you have any other questions.
Alyse says
This looks amazing and I can’t wait to try it!! Can you use any type of cheese?
Taming of the Spoon says
I have only ever used cheddar cheese in this recipe. Classic gougère uses Gruyère cheese so I think that would work too if you like Gruyère and dill together. Let us know how this turns out if you try it with another cheese.
Monica S. Caldwell Williams says
Super simple to follow the easy directions! Thanks for “dumbing it down” for the baking impaired. My son had to make these for his French class and they came out perfectly. Thank you!
Taming of the Spoon says
Thank you for so such a nice comment. I am so very happy this recipe worked for you and your family – it’s such a good recipe to have in your cooking arsenal.
Leah says
The undersides of my puffs often get torn off. They get stuck to the parchment paper. What can I do to fix this?
Taming of the Spoon says
It’s very unusual for puffs to stick to parchment paper. I’ve heard of them sticking to wax paper but not parchment. Some things to look at would be the quality of the parchment paper or try using the re-usable silicone (Silpat) baking mats instead of parchment. The other thing to look at is whether the puffs are being under or over baked. If they are undercooked and still a little wet, they might stick. Be sure to bake the puffs until they feel slightly crispy when tapped. I hope that helps.
Robin says
I was weary about making these despite how amazing and easy they looked, the reviews didn’t give me much confidence in the recipe. I was sure I messed them up half way through making them then I knew I really did it when I used my large ice scream scoop and ended up with only 15 puffs. I let it bake a bit longer, popped then out and they looked amazing and tasted even better! We cut them in half, spread lightly with pesto on both sides then added thick cut bacon and tomatoes and OMG! They were amazing on their own but even better as a sandwich bun. Make em, you can’t mess then up!
Taming of the Spoon says
That is the best comment ever! Thank you so much!! I am very happy everything worked out so deliciously in the end.
Hillary says
I needed to triple the recipe and I literally followed it word for word and did my math correctly but the dough was not thick and clay like. it was actually runny. do I just add more flour?
Taming of the Spoon says
Have you already added the eggs? If so, I don’t think I would add more flour since the flour won’t get cooked into the dough properly.
Was the dough stiff at all after you added the flour but before you added the eggs?
jackie ridenour says
is this recipe affected by humidity? Cream puffs can be so dependent on other factors I havent had much luck with them.
Taming of the Spoon says
I live in Houston (which can be pretty humid) and I haven’t had a problem with these not rising. It’s true that I tend to make them in November when the humidity is lower than it is in the summer. Be sure to bake the puffs until they feel slightly crispy when tapped. If you take them out too soon, they will collapse.