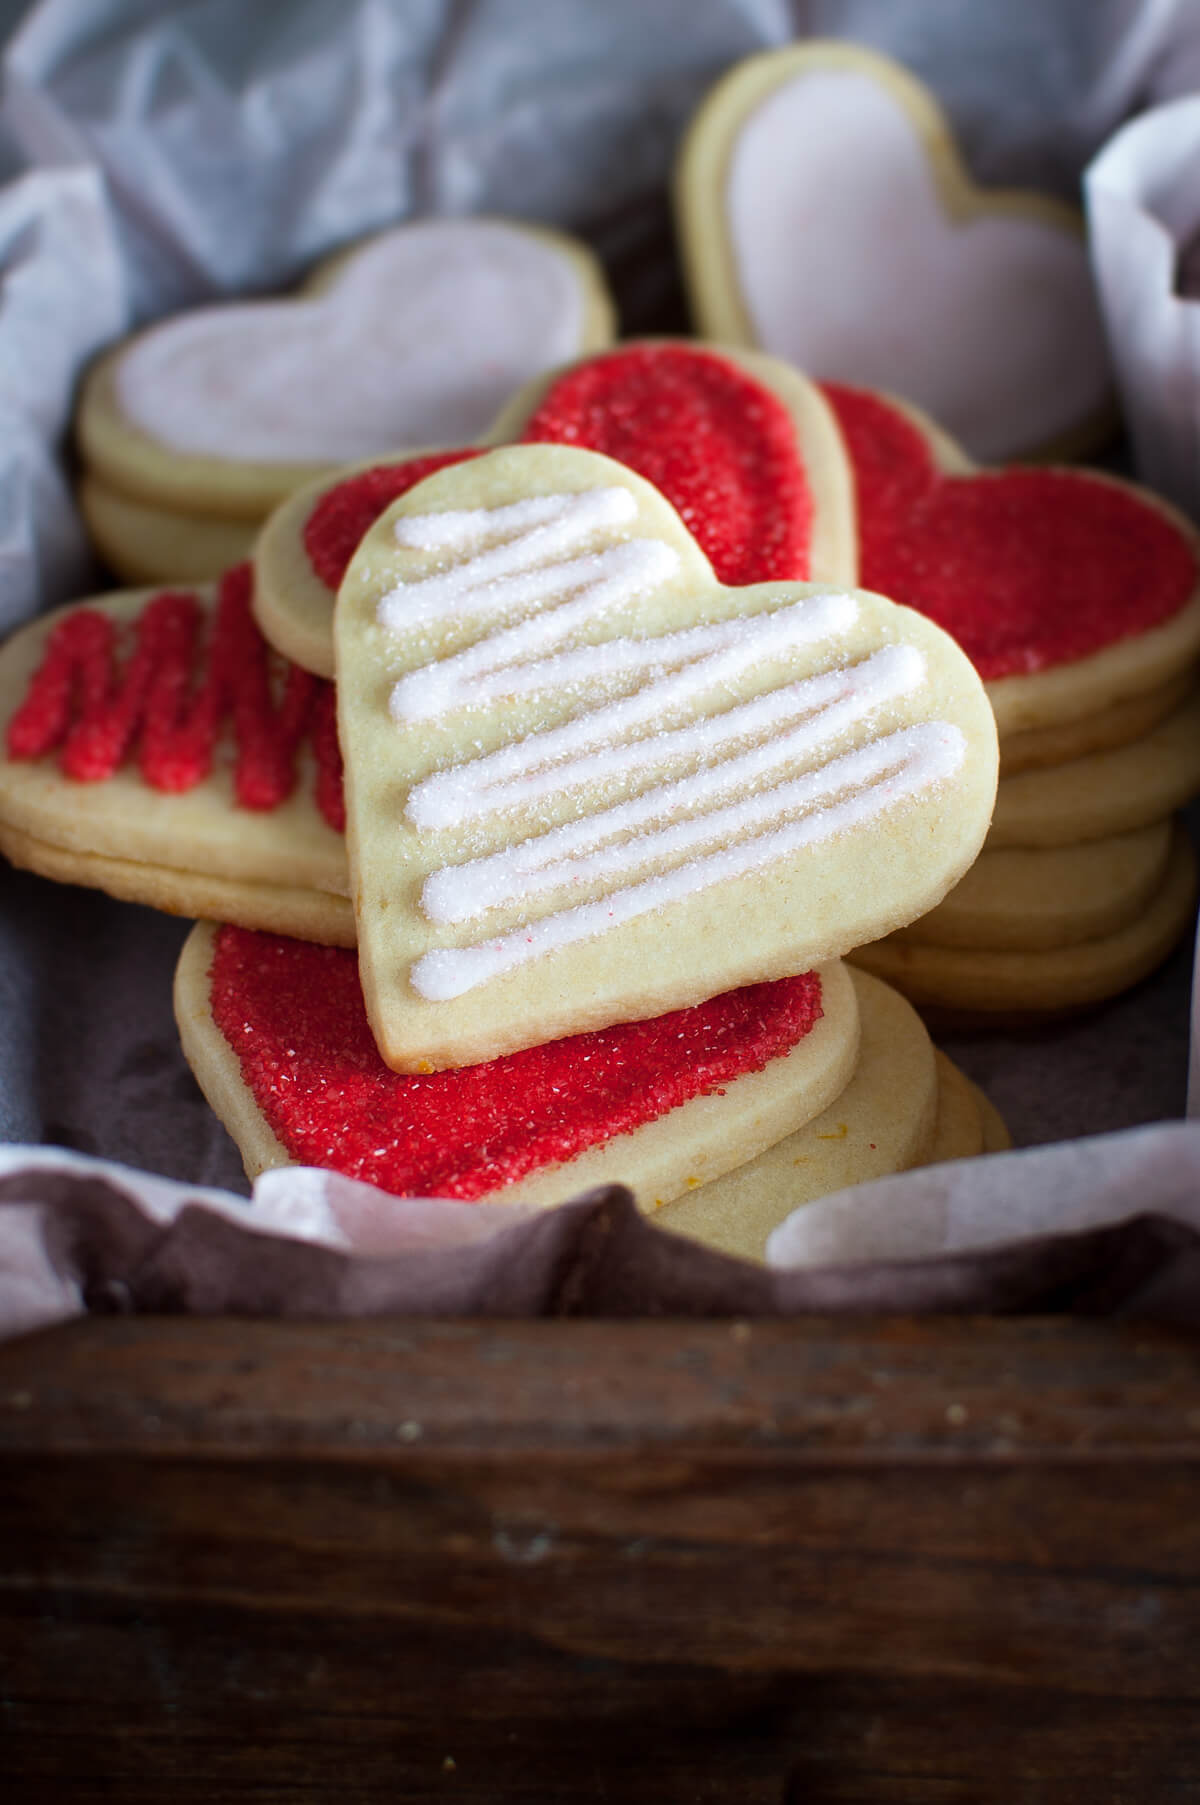
These soft cut-out sugar cookies are perfect to cut out in your favorite shapes for the holidays. Decorate them with an easy 2-ingredient icing (no egg whites needed) and some colored sugar to get beautiful cookies with less work.
- Prep Time:
3 hours - Cook Time:
15 mins - Total Time:
3 hours 15 minutes *
* Includes time to chill and roll out dough.

It’s almost Valentine’s Day and what better way to tell someone you love them than to make something sweet for them. I have been making these classic sugar cookies for a long time now and they always make people smile.
These sugar cookies have shown up in all manner of shapes and colors at many birthday parties, camping trips, and in many care packages (along with some dark chocolate cookies with espresso and some almond biscotti with chocolate glaze) throughout the years.
But Valentine’s Day sugar cookies are still my favorite. The basic heart shape is simple to cut out and decorate but the cookies still look really beautiful. Anyone receiving one of these cookies will know how special they are.

Classic sugar cookies with a twist
Though classic sugar cookies are flavored with vanilla extract, these cookies are accented with fresh lemon zest and little bit of fresh lemon juice. The lemon flavoring isn’t strong. It’s just enough to add a boost of bright flavor.
I also don’t use royal icing that is so often used to decorate sugar cookies. Royal icing lets you make some amazing decorations but, frankly, I don’t like the taste of it. I also don’t have great piping skills and don’t have the patience to mix several colors of icing at different consistencies for piping and flooding.
Decorating cookies the easy way
Icing on sugar cookies doesn’t need to be complicated. To simplify the decorating process, I mix a simple icing made from just confectioner’s sugar and milk. No meringue powder and no egg whites are needed. I make the icing just thick enough to hold its shape but still thin enough to spread. I keep the icing basic white and use different colored sugars to add color and sparkle to the cookies.
The technique is called flocking where decorating sugar is sprinkled on an area of wet icing. The advantage of the flocking technique is that the sugar hides many icing flaws. So, those of us with less than perfect piping skills can still make really pretty cookies.
Sugar for decorating cookies
To decorate sugar cookies, I use colored sanding sugar which have larger crystals than the regular granulated sugar that you would use for baking. This makes it perfect for adding sparkle to the cookies. Sanding sugar comes in a variety of colors so you can use it for any occasion from Christmas cookies to Halloween cookies. Sanding sugar can be found in the baking aisle of most major grocery stores and at some craft stores, like Michaels or Hobby Lobby. I most often see (and use) the Wilton brand. You can also order them online from baking supply retailers such as King Arthur Baking.
Tips for making sugar cookies
My other trick to making sugar cookies is having a small offset spatula on hand. It is the best tool for loosening the cookie cut-outs from your work surface and transferring them to the baking pan and for moving the baked cookies from the baking pan to the cooling rack. It’s also great for spreading icing on the cookies. You can usually get a small offset spatula for around $5 and it’s worth every penny.
I think my children and my nephews, who I usually make these cookies for, would start rioting if I ever stopped making these. Fortunately, I have no plans to stop anytime soon. I hope you can find time to make these for someone you love too. Happy Valentine’s!

Classic Sugar Cookies
- Prep Time: 3 hours
- Cook Time: 15 minutes
- Total Time: 3 hours 15 minutes
- Yield: About 30 (4-inch) cookies
- Category: Dessert
- Method: Baking
- Cuisine: American
Description
These soft cut-out sugar cookies are perfect to cut out in your favorite shapes for the holidays. Decorate them with an easy 2-ingredient icing and some sanding sugar to get beautiful cookies with less work.
Ingredients
For the cookies
- 4 cups all-purpose flour
- ½ teaspoon salt
- 1 teaspoon baking powder
- 1 cup unsalted butter, room temperature
- 2 cups granulated sugar
- 2 large eggs, room temperature
- 2 teaspoons fresh lemon juice
- Zest of 2 small lemons (about 2 tablespoons)
For decorating
- 4 cups confectioner’s sugar
- 4–5 tablespoons milk
- Sanding sugar or sugar sprinkles in your choice of color(s)
Instructions
For the cookies
- Mix dry ingredients. In a large bowl, whisk together flour, salt, and baking powder. Set aside.
- Cream sugar. In the bowl of an electric mixer fitted with the paddle attachment, beat butter and sugar together on medium speed until light and fluffy, about 4 minutes. Beat in eggs until thoroughly combined.
- Add dry ingredients and lemon juice. Add flour mixture and mix on low speed until well mixed. Add lemon juice and lemon zest; beat until lemon is mixed in well.
- Wrap and chill dough. Turn the dough out onto a work surface and divide into 2 equal portions. Shape each portion into a ball, then flatten the balls into disks. Wrap in plastic wrap and refrigerate for at least one hour and up to 3 days.
- Prep oven. Heat oven to 325 degrees F.
- Roll and cut dough. On a lightly floured surface, roll dough to 1/8 to 1/4-inch thick. Cut into desired shapes. Transfer cookies to ungreased baking sheets and chill until firm, about 15 minutes. Gather up and reroll the scraps of dough and cut out more cookies. Repeat with the remaining dough disks. If dough becomes too soft to work with, refrigerate the dough until it is firm again.
- Bake cookies. Bake cookies 9 to 12 minutes, or until edges of cookies are just starting to brown. Cool on wire racks then decorate as desired.
For decorating
- Make icing. In a medium bowl, whisk together confectioner’s sugar and 4 tablespoons of milk. The icing should be very thick at this point. Continue to whisk in more milk 1 teaspoon at a time until icing is just spreadable but is not runny. The icing should feel just a little stiff when you stir it.
- Decorate cookies. Pour icing into a pastry bag fitted with a small (Wilton #5) icing tip. Outline edge of cookie with icing; fill in the outline with more icing using zig-zag lines. Using a small offset spatula, spread icing until smooth. Sprinkle cookie liberally with sanding sugar, then pour excess sugar into a bowl. Repeat with remaining cookies. See Notes 1- 4.
- Let icing dry. Let cookies sit in a single layer on a baking sheet or cooling rack for at least 8 hours to let the icing harden. Use a small pastry brush to brush away any stray sugar crystals, if desired.
Notes
- To fill the pastry bag, place the bag tip side down in a tall glass. Fold the top of the bag down over the edge of the glass to form a cuff. Using a large rubber spatula, scrape the icing into the bag, filling it to one-half to two-thirds full. Unfold cuff, twisting the bag closed to force the icing down into the bag and remove any air bubbles. Secure the bag closed with a twist tie.
- To prevent the tip from clogging while icing cookies, place a damp paper towel in the bottom of the glass.
- To fix any wayward lines of icing and sugar, use the long edge of a toothpick to gently push the icing into place.
- For faster decorating, just pipe zig-zag lines on cookies then sprinkle with sanding sugar.
- Store cookies in an airtight container at room temperature for up to 1 week.
- Recipe from Martha Stewart Living.


Charlotte @ whatcharlottebaked says
I love the glitter! I would be so happy to receive these on Valentine’s Day. Plus, lemon flavouring sounds interesting – I might give it a try sometime 🙂
Taming of the Spoon says
Oh, I hope you do get to give these a try. The hint of lemon is so good!